Your cart (0)
Your cart is empty
Tax included and shipping calculated at checkout
Recommended products


Drawer menu
Tax included and shipping calculated at checkout


Looking for 3 floating shelves ideas that feel intentional, balanced, and easy to live with? This guide shows exactly how to arrange three shelves – side-by-side, stacked, or staggered – so your wall looks designed, not cluttered. You’ll get spacing measurements that work in real rooms, simple styling formulas, and sustainable material tips that honor craft and nature. Whether it’s a calm living room, a tidy coffee bar, or a spa-style bath, we’ll turn three plain shelves into a beautiful, hardworking feature.
In interior design, odd numbers create better visual interest, and using three shelves is the best way to use your wall space well. Three levels naturally give you a start, middle, and end, creating a visual rhythm that guides your eye up and down the wall. This number allows for both balanced symmetry or creative, offset asymmetry without the display looking unfinished. Three separate levels also make it easy to create different functional areas. This flexibility is key to mastering all 3 floating shelves ideas and avoiding the plain, blocked look of just two shelves.
Anchor your perfect trio today! These reclaimed timber floating shelves provide the unmatched texture and depth to make your three-level display stunning.
These measurements keep your shelves looking good and safe. Follow them when you install and style your set of 3 floating shelves ideas.
Vertical gaps: Leave 10–14 inches for decor-only walls. Above kitchen counters or desks, leave 16–18 inches so taller appliances fit.
Horizontal gaps: Keep 8–12 inches between separate shelves placed in a row. This looks balanced and neat.
Clearance above items: Always leave 2–3 inches of space above the tallest item on each shelf so nothing feels crammed.
Eye level: Center art or photos around 57–60 inches from the floor for easy viewing. Place everyday items near shoulder height so you can reach them.
These advanced formulas ensure the decoration is cohesive, balanced, and professional, regardless of which of the 3 floating shelves ideas you use.
Rule of Thirds: Visually split each shelf into three parts. Place the heaviest, most important items at the two dividing lines ( ⅓ and ⅔ of the way across) instead of only in the center.
Use Open Space: Aim for 30-40% empty space on every shelf. This lets your best items stand out and is the quickest way to avoid a cluttered look across your set of 3 floating shelves ideas.
Color Echo Technique: Pick 2-3 main accent colors. Repeat each color at least twice across all three shelves to create a subtle but strong visual connection and rhythm.
Mix Textures for Depth: Combine at least three different textures on your shelves (e.g., hard wood + smooth ceramic + soft fabric) for warmth and depth that keeps the eye interested.
Visual Weight Ladder: Place the largest, darkest, or heaviest items low and to the left. Keep the smallest, lightest, or brightest items high and to the right. This small diagonal shift gives a strong visual "lift" to your 3 floating shelves ideas composition.
A truly professional display is achieved by applying these rules. Focusing on the rule of thirds and color echo technique ensures your entire set of shelves is unified and visually strong. These formulas turn a simple arrangement into a cohesive, dynamic, and perfectly executed vertical statement.
These layout blueprints are designed to resolve typical wall space issues and clearly set the overall aesthetic for your 3 floating shelves ideas.
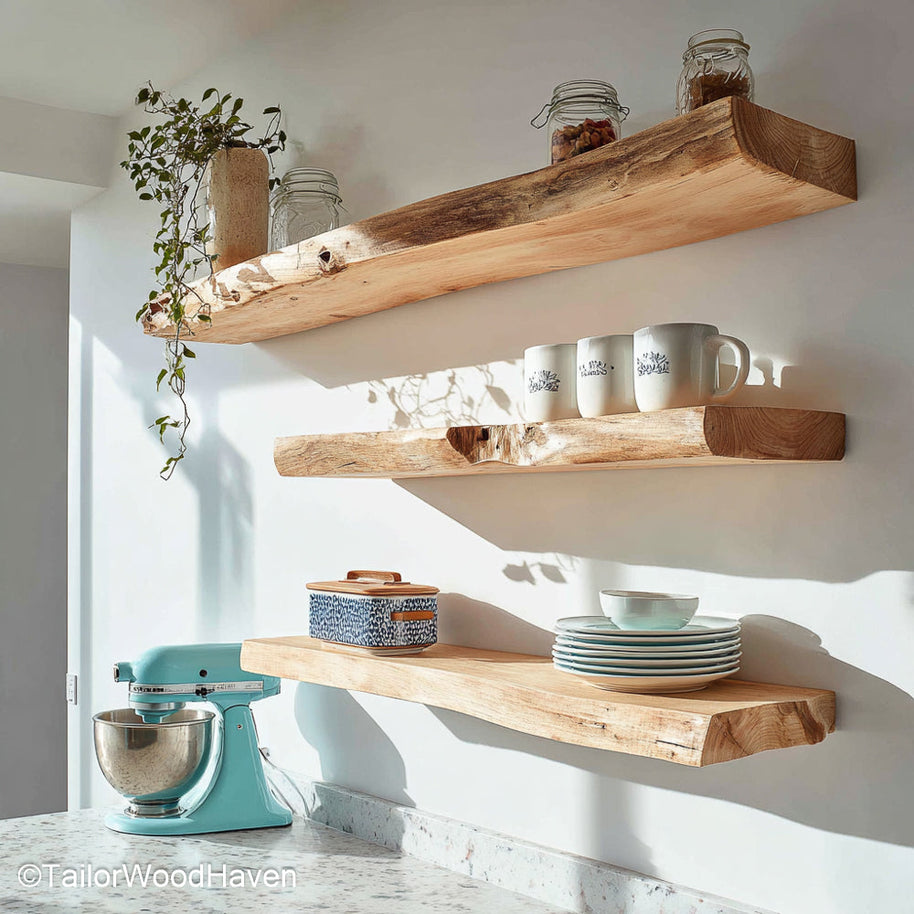
This arrangement is a calm, modern classic. Place all three shelves on the same straight, horizontal line, which works great over a sofa or long hallway. Leave 8-12 inches of space between each shelf. If the row is above seating, mount it 10-12 inches above the sofa back. For decorating this set of 3 floating shelves ideas, use a simple rhythm: a tall vase on the left, an art print and stack of books in the middle, and a light mix (like a basket and plant) on the right. Repeat a few colors across all shelves to tie the row together.
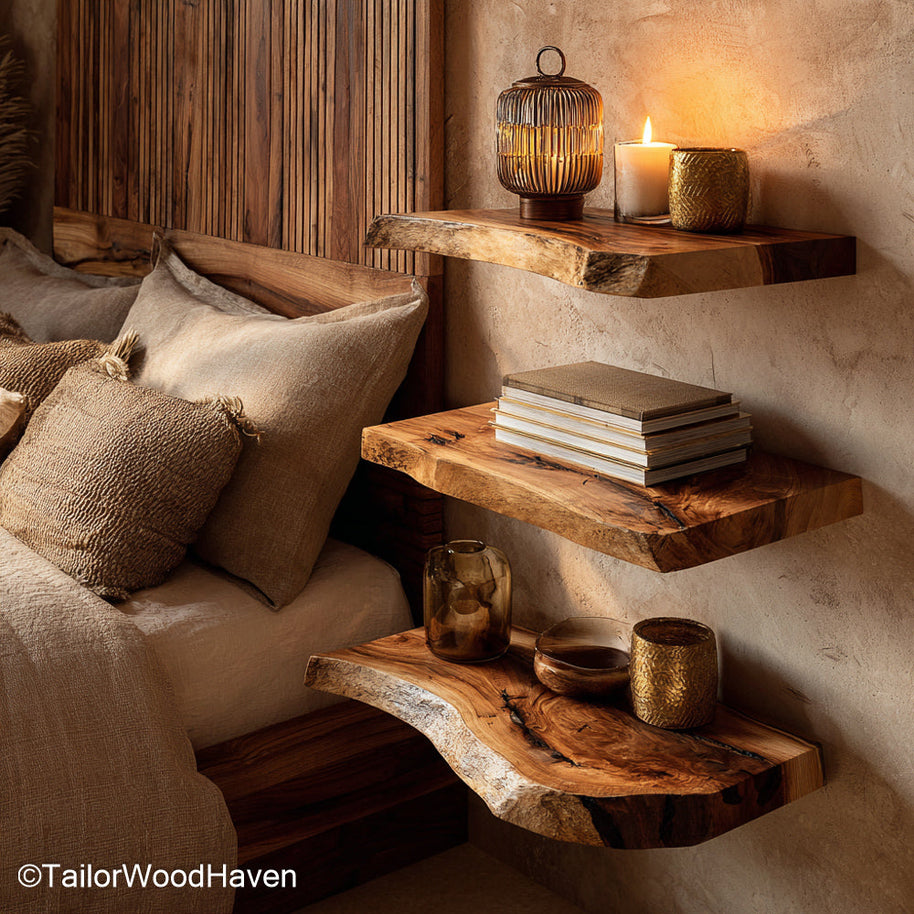
A vertical column is neat and saves space, working perfectly for entryways, narrow walls, or small bathrooms. Place the bottom shelf around shoulder height so you can easily reach daily items. Keep 12-14 inches of space between the shelves above it. Style by visual weight: put the heaviest items low, useful items in the middle, and light items on top. This clean, vertical approach is one of the smartest 3 floating shelves ideas because it makes the room feel taller while keeping the display practical.

Ready to bring a clean vertical style to your home? These floating shelves designed from a single hardwood plank offer unmatched durability and a streamlined look perfect for narrow spaces.
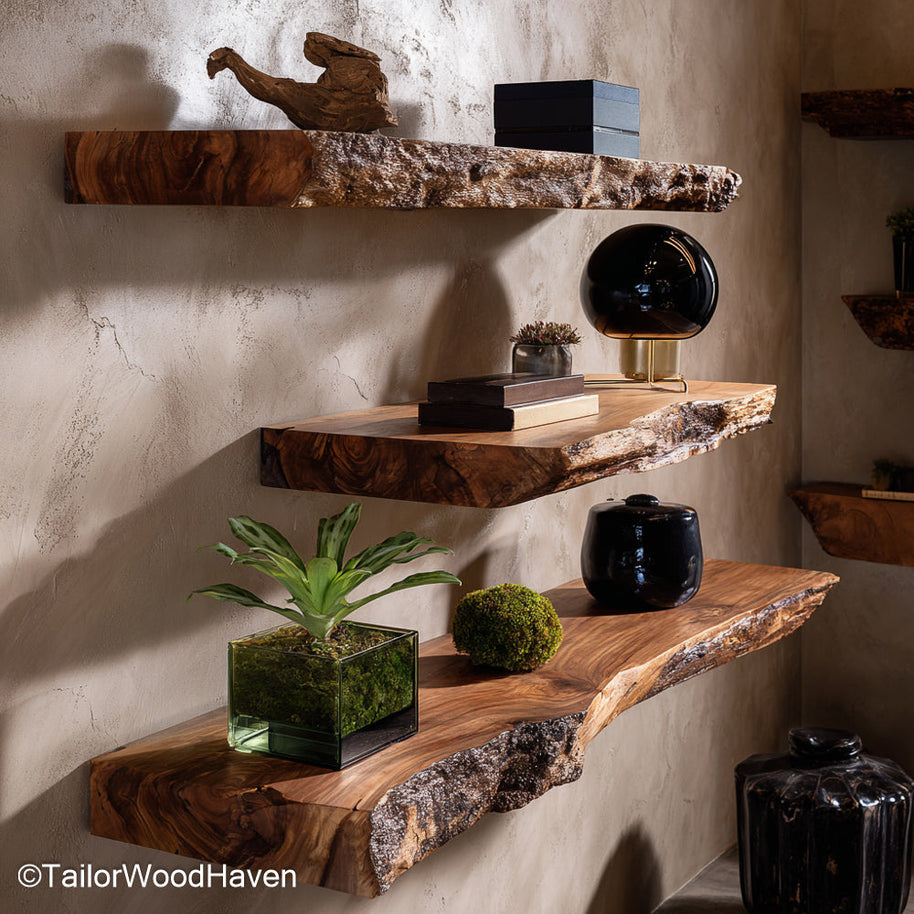
Staggering the shelves creates a dynamic look without chaos. Place two shelves horizontally, then move the third shelf up or down by 6-10 inches and to the side by 10-14 inches. This creates a triangle shape that guides the eye. Decorating with a triangle of heights: one shelf gets the tallest item, another holds a mid-sized cluster, and the last stays light with a single piece and open space. Repeating one material across all three shelves is one of the most effective 3 floating shelves ideas for making the offset design look intentional.
Achieve a dynamic, farmhouse feel in your cooking space: our rustic kitchen floating shelves provide the perfect, warm wood texture to anchor your staggered, intentional display.
This "walking" layout moves gently up the wall, perfect for staircases or offices where you want a sense of progress. Keep the up-and-over steps consistent, like a gentle staircase. Put the largest shelf at the bottom for function, like holding bins or books. Move to framed art on the middle shelf, and put a single, light item, like a plant, at the top. Limiting each shelf to three items or less is a great technique for these 3 floating shelves ideas to keep the movement clean and pleasing to the eye.
Bring a sense of progress and warmth to your walls: these rustic wooden shelves design is the perfect sturdy, textured foundation for this visually appealing step-ladder layout.
Corners can feel cozy, not strange. Mount two shelves to meet at the corner at the same height, and let a third shelf continue 12-16 inches onto the next wall. This creates a natural nook for a reading or coffee spot. Anchor the corner with your tallest item, like a lamp, then use lighter pieces moving outward. Use matching containers, such as two identical jars, to visually link the "L" shape. This smart arrangement is one of the best 3 floating shelves ideas for winning space in a small apartment.
Choosing the right layout solves your wall space challenges easily. This ensures your arrangement is a successful set of 3 floating shelves ideas, looking dynamic, professional, and perfectly finished. For more floating shelf ideas, further check HGTV’s tutorial.
A typical vertical gap is 12 to 18 inches between each shelf. Measure the height of your tallest item (like a vase or book stack) and add 2 to 3 inches of clearance above it to determine the minimum spacing needed.
The best layout depends on the room. A vertical stack is best for narrow walls (like in a bathroom). A horizontal trio (three in a row) is best for symmetry over a couch or desk.
To stagger, install two shelves aligned vertically (e.g., top and bottom). Install the third shelf offset horizontally by 10–14 inches and vertically by 6–10 inches, creating a dynamic, informal pattern.
You must anchor the brackets directly into wall studs for safety and strength. Use a level to ensure the brackets are perfectly straight, then slide the shelf over the rods and secure it tightly.
They can sag if they are overloaded or if the brackets were not mounted directly into wall studs. To prevent sagging, ensure you use heavy-duty hardware and do not exceed the shelf's weight limit.
The best depth depends on the function. Use shallow shelves (5–7 inches) for toiletries or small decor. For heavy items, like kitchen plates or books, choose deeper shelves (9–11 inches) for stability.
Mastering these 3 floating shelves ideas happens when you plan every step carefully. By choosing the right layout and applying specific decorating rules (like repeating colors or placing the heaviest items low), you guarantee your arrangement looks balanced and professional. The great reward for carefully planning and styling your 3 floating shelves ideas is a perfect, dynamic vertical display that shows true design skill.


