Your cart (0)
Your cart is empty
Tax included and shipping calculated at checkout
Recommended products


Drawer menu
Tax included and shipping calculated at checkout


Unlike off-the-shelf options, a DIY approach ensures your shelves are perfectly tailored to your space, aesthetic, and functional demands.
Here's how to make floating shelves for kitchen with style and function in mind, transforming your culinary space with personalized flair.
Before cutting any wood, visualize the end result. The style of your floating kitchen shelves should seamlessly integrate with your existing kitchen decor. This initial design phase is crucial for a cohesive outcome.

These heavy-duty floating shelves are crafted from solid wood with concealed brackets and reinforced hardware to ensure maximum weight capacity.
For a bright, airy, and uncluttered look, opt for light-colored woods like birch, maple, or white oak. The shelves should be relatively thin (around 1.5 inches) with clean, straight edges.
Finish them with a clear, matte sealant to preserve their natural light tone. This style is perfect for those asking how to make floating shelves for kitchen that enhance natural light and simplicity.
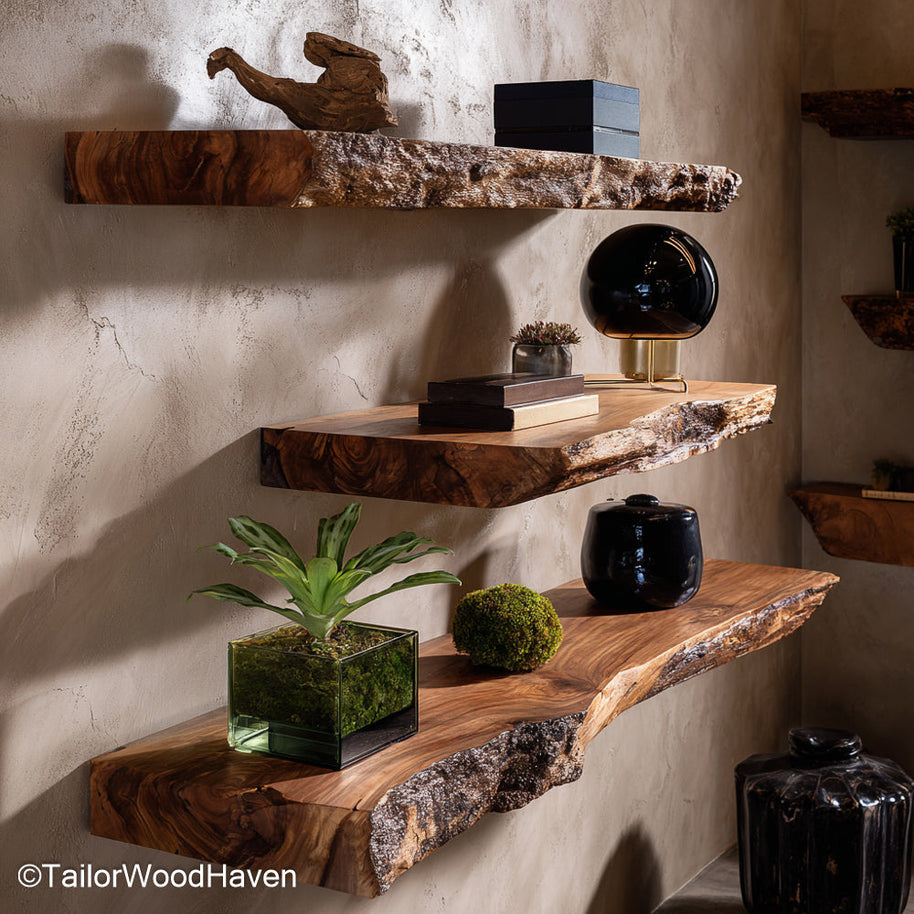
If your kitchen leans towards a rustic or farmhouse aesthetic, choose thicker wood slabs (2−3 inches), perhaps even with a live edge.
Reclaimed barn wood, distressed pine, or rough-sawn oak work wonderfully. A natural stain or a simple wax finish will highlight the wood's texture and imperfections, adding warmth and character.
This approach dictates a specific answer to how to make floating shelves for kitchen with a country charm.
For an industrial vibe, consider darker woods like walnut or deeply stained pine. Pair these with visible metal pipe brackets or heavy-duty L-brackets in black or raw steel.
The contrast between the dark wood and metal creates a rugged yet refined look. This provides a strong visual statement on how to make floating shelves for kitchen with an urban edge.
Beyond aesthetics, functionality in a kitchen is paramount. Where you place your shelves, and what you plan to put on them, should influence your material choice and finish. This practical consideration is vital when learning how to make floating shelves for kitchen.

It features a clean, flush-mount design using internal concealed brackets, making it ideal for creating generous storage or display space in long hallways, bedrooms, or entryways.
If your shelves will be near a stovetop, heat and grease are major concerns.
Material: Opt for dense hardwoods that are less likely to warp from fluctuating temperatures.
Finish: A heat-resistant polyurethane or lacquer is essential to protect the wood from direct heat and make grease splatter easier to clean. Avoid oil finishes here, as they can become sticky over time.
For shelves above the sink, moisture is the enemy. Getting the sealing right is a crucial step in learning how to make floating shelves for kitchen that last in high-humidity zones.
Finish: A marine-grade sealant or a high-quality polyurethane is critical to prevent water damage, swelling, and mold growth. Ensure all surfaces, especially the bottom edge, are thoroughly sealed.
Shelves in high-traffic prep zones will endure more bumps and scratches.
Material: Choose robust hardwoods like oak or maple that are naturally resistant to dents.
Thickness: Consider slightly thicker shelves for added durability.
In Jenna Sue’s guide, she planned shelf placement based on how she used her kitchen daily - a practical approach for functional styling.
This foresight is key when figuring out how to make floating shelves for kitchen that genuinely serve your culinary habits.
Building your own floating kitchen shelves gives you control over the quality and strength. Here's a concise guide to the construction process.
These reclaimed timber floating shelves are crafted from upcycled wood, featuring rich character and a wall-mounted form, perfect for rustic or eco-conscious homes.
Measure and Cut
Use a miter saw or circular saw to cut your chosen wood to the precise length and depth. For a professional look, ensure all cuts are perfectly square.
Sanding Progression
Start with an 80-grit sandpaper to shape and remove major imperfections, move to 120-grit for smoothing, and finish with 220-grit for a silky-smooth surface.
Smooth edges make the shelf look polished. This meticulous preparation is crucial for how to make floating shelves for kitchen that look store-bought.
The "floating" effect comes from invisible support.
Marking
Carefully mark the precise locations for your hidden bracket rods on the back edge of the shelf. Accuracy is paramount here.
Drilling
Use a drill press (if available, for perfect alignment) or a handheld drill with a drilling guide to create clean, straight holes that match the diameter and depth of your bracket rods.
The holes must be deep enough to provide ample support. This step defines how to make floating shelves for kitchen appear truly suspended.
Secure installation is non-negotiable for kitchen shelves, especially when learning how to make floating shelves for kitchen.
Locate Studs
Use a reliable stud finder to locate the wall studs. Mark their centers precisely. Your brackets must be anchored into these studs for maximum load capacity.
Mount Brackets
Using a level, mark a straight line for your shelf's bottom edge. Secure your hidden floating shelf brackets directly into the wall studs with long, heavy-duty structural screws.
Attach Shelf
Carefully slide the pre-drilled shelf onto the bracket rods. Use a rubber mallet to gently tap it into place for a snug fit.
If building a hollow box shelf, slide it over a securely mounted wood cleat and fasten it from the top/bottom with small finishing nails or screws.
For a clean install and modern appeal, Plank & Pillow’s tutorial walks through using floating brackets and precise leveling, providing excellent guidance on how to make floating shelves for kitchen with a professional finish.
A beautiful shelf is only truly functional if it's durable. Proper finishing protects your investment and ensures your shelves can withstand the kitchen environment. These tips are vital for those learning how to make floating shelves for kitchen that endure.
For shelves holding dishware or exposed to food prep:
Polyurethane: Offers excellent water and scratch resistance.
Food-Safe Oils:
Options like tung oil or mineral oil penetrate the wood, providing a natural, matte finish that is safe for incidental food contact.
Reapply periodically. Choosing the right finish is the final step in learning how to make floating shelves for kitchen that are safe and durable.
Even the strongest floating kitchen shelves have limits.
Heavy Items on Lower Shelves:
Store your heaviest items (stacks of plates, large canisters) on lower shelves and closer to the wall mounting points.
Distribute Weight Evenly: Avoid piling all heavy items in the center or at one end of the shelf.
Know Your Brackets:
Be aware of the weight rating of your chosen brackets and wood. Understanding these limits is crucial after mastering how to make floating shelves for kitchen construction.
Open shelves require more frequent dusting than closed cabinets.
Regular Wipes: Wipe down shelves regularly with a damp cloth to remove dust and light grease.
Deep Clean:
For stubborn grease, use a mild dish soap solution. Ensure your finish is waterproof before using any wet cleaners.
Proper maintenance extends the life of your beautifully crafted floating kitchen shelves, proving that long-term care is vital to the success of how to make floating shelves for kitchen.
Now that you know how to make floating shelves for kitchen, it's time to bring them to life with thoughtful styling. This transforms them from mere storage into a decorative focal point.
Rule of Thirds:
Mentally divide your shelf into three sections. Dedicate one section to pure decor (a small plant, a piece of art), one to functional storage (stacked bowls, spice jars), and one to a mix.
Curated Collections:
Display items you genuinely use and love. Group similar items (e.g., all white ceramic, or glass jars of pasta).
Negative Space:
Don't overcrowd the shelves. Allow some breathing room for items to stand out. This enhances the "floating" aesthetic.
These rustic wall bookshelves are built from thick slabs with a worn, character-rich surface and an open floating design, perfect for farmhouse-style displays or storage.
Consistency is key for a cohesive look.
Uniformity:
If you have colorful dishware, use a single color scheme on your shelves for a dramatic visual impact.
Clear Canisters:
Decant dry goods into matching clear glass or ceramic canisters. This instantly upgrades pantry staples into attractive display items.
Floating shelves are easy to refresh.
Seasonal Accents:
Swap out small decor items, colors, or plants to match seasons or holidays. This keeps your kitchen feeling fresh and current without a major overhaul. This final step showcases the full potential of learning how to make floating shelves for kitchen.
Personal Touch:
Display handmade pottery, vacation souvenirs, or family photos to infuse personal character into your floating kitchen shelves.
Learning how to make floating shelves for kitchen is a rewarding project that combines practical utility with customized style.
By selecting materials carefully and mastering secure installation, you can create durable, beautiful, and highly functional storage solutions, enjoying a more open, organized, and aesthetically pleasing kitchen space.


