Your cart (0)
Your cart is empty
Tax included and shipping calculated at checkout
Recommended products


Drawer menu
Tax included and shipping calculated at checkout
Your wishlist is empty.
Continue shopping


The installation of floating shelves is only the starting point. Styling is the crucial final step that elevates these simple structures into essential pieces of home décor. Learning how to style floating shelves transforms an architectural element into a personal, visual statement.
When considering how to style floating shelves, the room's function dictates the content. What works for a calming bedroom corner will clash in a bustling kitchen.
Context is king, ensuring the displayed items feel natural and relevant to the space they occupy.
Living room open shelves are perhaps the most public and therefore require the most intentional curation. These shelves should offer a sophisticated mix of personal history and general interest.
The goal when deciding how to style floating shelves in a living room is to prevent them from looking like simple storage units. Curated book stacks should be interspersed with objects d'art.
Curated Books:
Mix vertical stacks (using bookends for support) with short, horizontal piles (acting as pedestals). Grouping books by color or size can introduce a sense of order.
For a minimalist look, consider facing a few key titles outward, showing only the pages, or removing dust jackets to reveal muted cloth bindings.
Plants and Vases:
Plants, particularly trailing varieties like Pothos or String of Pearls, soften the hard angles of the shelves.
Use sculptural vases, even when empty, as visual anchors. Use a few taller pieces to create necessary height variation.
Layered Frames:
Lean smaller frames behind larger objects. This layering introduces depth, a key element when teaching yourself how to style floating shelves effectively. Avoid hanging everything; leaning keeps the display flexible and dynamic.
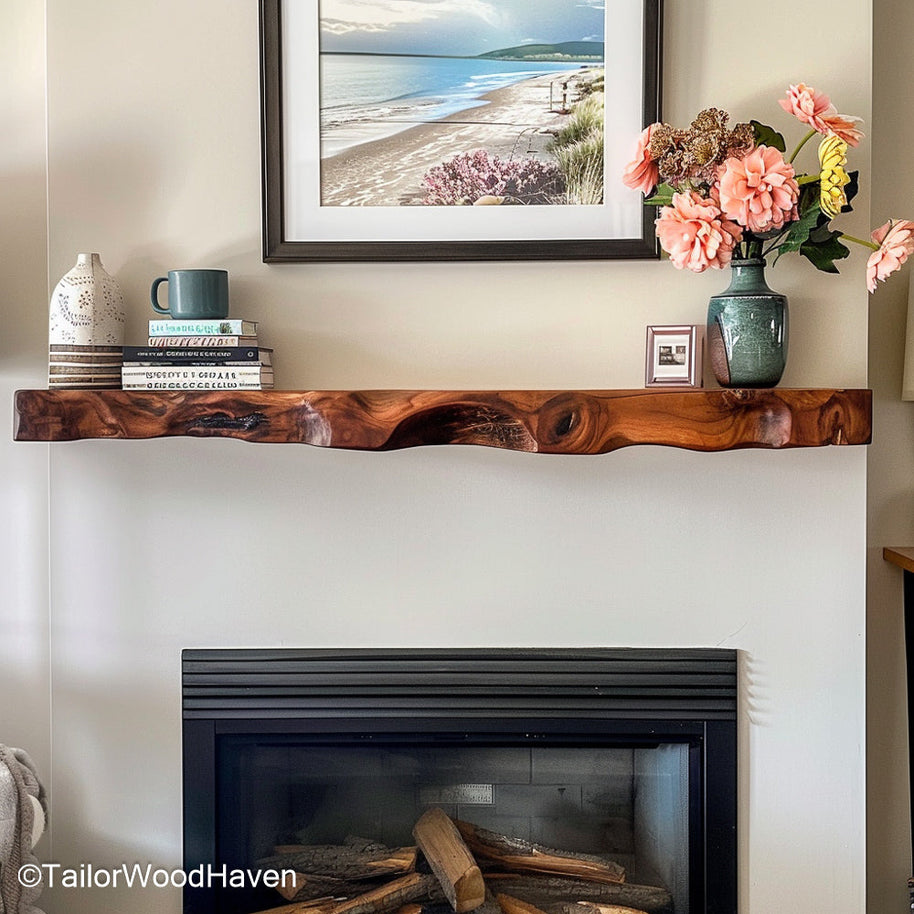
This thick wood slab, featuring striking live-edge styling, is specifically designed to function as a rustic, statement-making floating fireplace mantel.
In spaces utilizing large, multi-shelf units (like built-ins or extensive floating systems), the key is division. Treat the entire unit as a gallery wall, but break it down into smaller, individual vignettes to avoid overwhelm.
Divide into Sections:
Mentally divide the shelves into groupings of three (three horizontal shelves, or three adjacent vertical stacks).
Each section should tell a micro-story. For instance, the top shelf might be dedicated to reflective, high-shine objects (glass, mirrors), while the middle shelves focus on matte, natural textures (wood, ceramics).
Mix Décor and Storage:
Integrate stylish storage, such as woven baskets or decorative boxes, to hide necessary clutter (remotes, chargers, loose papers).
These functional items add texture and prevent the display from becoming purely aesthetic. Vary the material of these storage elements to add interest.
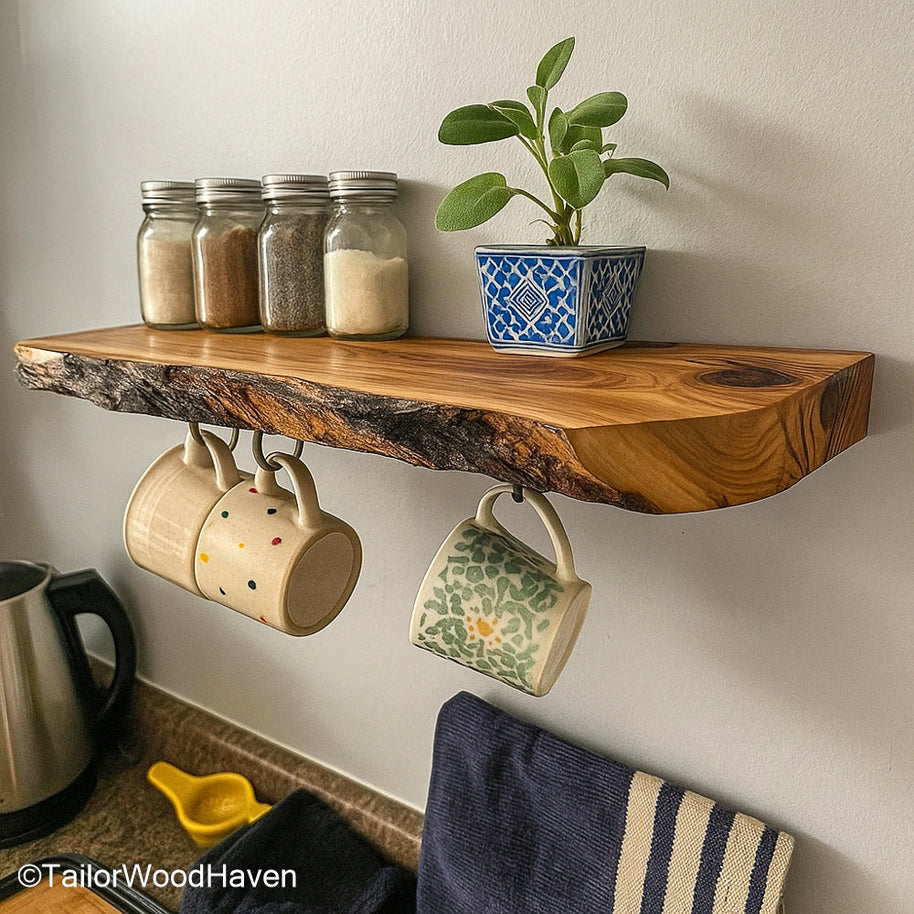
These durable, sealed wooden shelves offer convenient and stylish open storage for easy access to kitchen essentials like jars, dishes, and spices.
Dining room shelves signal a readiness for entertaining, requiring items that are both beautiful and functional. When learning how to style floating shelves here, the goal is to balance serving essentials with decorative flourishes.
Mix Glassware with Seasonal Décor:
Display fine stemware to catch the light, balancing it with opaque items like serving platters or ceramic bowls on adjacent shelves.
Seasonal Touch:
Rotate décor with the season (e.g., summer greenery vs. winter candles). A small stack of cookbooks adds warmth.
The functional elegance of the items is the key to mastering how to style floating shelves in this communal area.
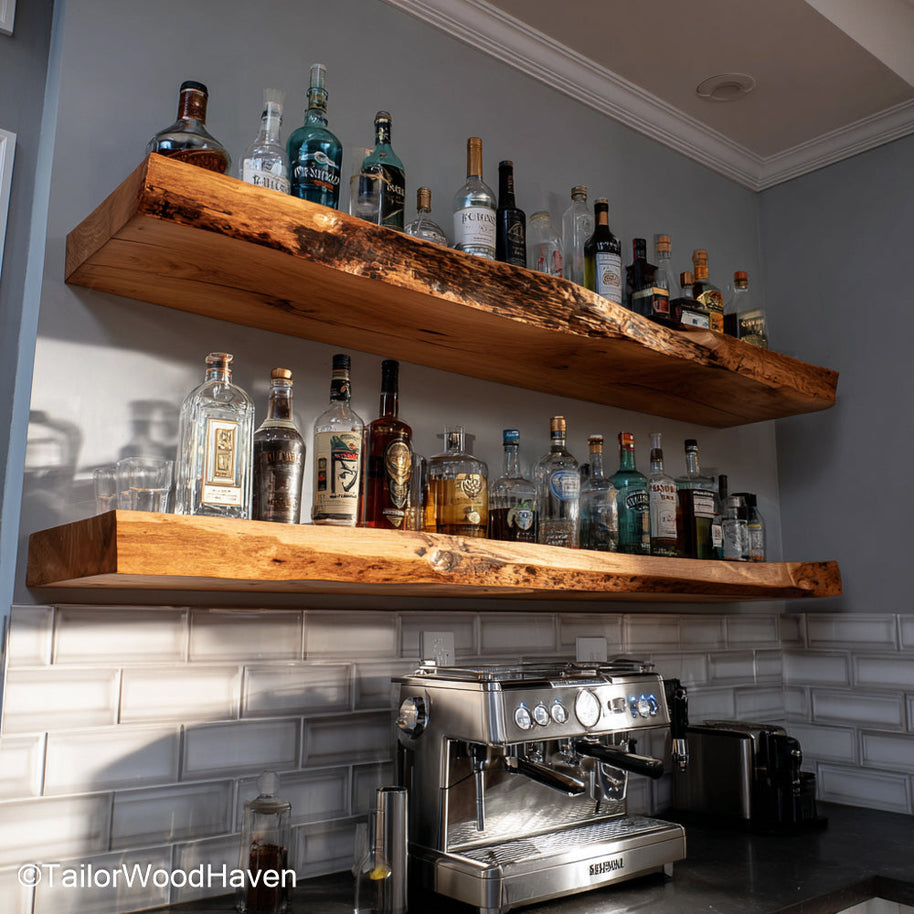
Crafted from rich walnut with a beautiful natural grain and bracket-free support, these shelves are ideal for adding warmth to kitchens or living rooms.
A curated floating shelf display relies on deliberate, time-tested design rules. Adhering to these principles transforms a random collection of items into a cohesive, artistic statement, showcasing your mastery of interior design.
The human eye is drawn to odd numbers (threes or fives) and asymmetrical groupings. This principle is vital when considering how to style floating shelves for instant dynamism.
Group in Threes: Arrange small items closely so they read as a single unit, creating visual weight.
Visual Triangles: Use items of varying heights within each grouping so their tops form a subtle visual triangle, guiding the eye and preventing a monotonous horizontal line.
Asymmetrical Balance: Balance visual weight rather than matching objects. Counter a tall, slender vase with a shorter, wider stack of books and a heavy art piece.
Layering is the cornerstone of professional shelf styling, adding essential depth and complexity. This technique is key to planning how to style floating shelves for a multidimensional look.
The Two-Deep Rule:
Ensure your display has at least two visual depths. Place flat items (framed art) against the wall in the back, and position three-dimensional objects (vases, sculptures) in the front, allowing a subtle overlap.
Vertical vs. Horizontal:
Use vertical book stacks as strong linear anchors. Use horizontal stacks as mini-pedestals to elevate smaller objects, ensuring every piece contributes to the overall visual story.
To make your shelves look sophisticated, introduce calculated contrast - the friction between opposing elements. Understanding this is central to learning how to style floating shelves professionally.
Texture Contrast: Place rough, organic elements (woven baskets, stone) directly next to smooth, high-shine items (glass, polished metal).
Geometric Contrast: Balance soft, round shapes (bowls, globes) with sharp, clean lines (square frames, vertical book spines). The disciplined use of these contrasts is a clear indicator of successful styling, demonstrating mastery over how to style floating shelves.
This shelf features thick walnut wood and clean lines, making it a versatile choice perfect for both rustic and urban wall designs.
Consulting professional work offers effective templates for inspiration and practical examples of how to style floating shelves.
The primary lesson from magazine layouts is the strategic use of negative space: leaving 30% to 40% of the shelf empty (as shown in resources like The Spruce) is crucial to avoid clutter and highlight the floating design.
Designers consistently employ three key techniques for how to style floating shelves:
Repetition (Echoing):
Repeat a specific color or texture (e.g., brass or terracotta) across multiple shelves to create visual continuity without using the same object.
The Anchor Object:
Each shelf segment needs one dominant item (a large plant or art piece) that grounds the arrangement and serves as a starting point for grouping smaller items.
Vertical Organization:
When dealing with multi-tier systems, treat the shelves as a single vertical unit. The arrangement on one shelf should visually lead the eye to the next, demonstrating mastery of how to style floating shelves in a tall unit.
Knowing what not to do is often more important than knowing what to do. Avoiding these common pitfalls will drastically improve the result of your efforts to learn how to style floating shelves.
This is the number one mistake. When the shelf is packed with too many items, the display immediately loses its aesthetic value and becomes cluttered.
The 70/30 Rule:
Never fill a shelf more than 70%. Leave a minimum of 30% of the surface area empty.
This negative space is what allows the floating design to truly shine. When in doubt about how to style floating shelves, always remove one item rather than adding one.
The Visual Density Trap:
Even if the shelf isn't technically full, using many small, busy items can create visual density - the appearance of clutter. Balance small items with a few larger, simple, grounding objects.
A lack of color cohesion introduces chaos, regardless of how well the items are arranged geometrically.
Identify Your Base Neutrals:
Before starting, identify your room's two main neutrals (e.g., white and wood, or grey and black). Ensure 70% to 80% of your shelf items fall into these neutral categories.
Limit Accent Colors:
Introduce only one or two accent colors (e.g., green from plants, blue from a single vase). This restraint makes the accent color pop.
Beginners often fail when trying to decide how to style floating shelves by choosing too many disparate colors.
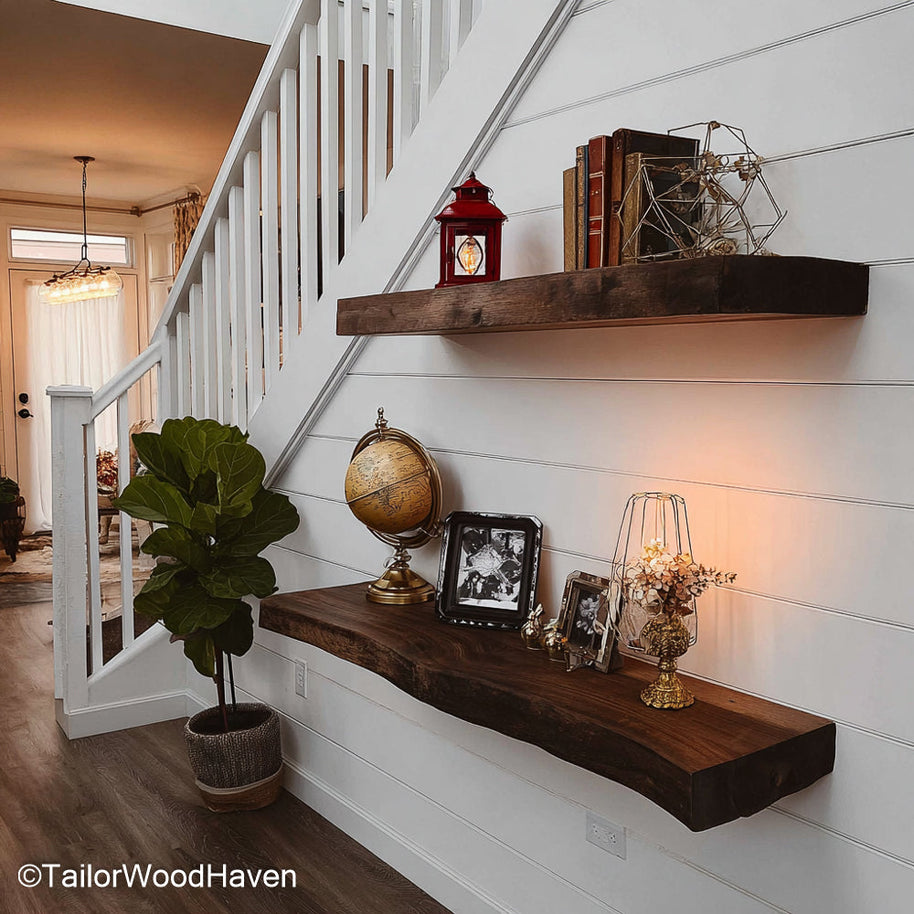
Built from solid walnut slabs with natural texture and hidden mounts, these shelves offer stylish, organic open storage for various home spaces.
Scale refers to the size of an object relative to the shelf; proportion refers to the size of the objects relative to each other.
No "Dwarf" or "Giant" Items:
Avoid placing items that are so tiny they get lost, or so large they look crammed onto the shelf. The tallest item should generally be no more than two-thirds the distance between the shelf surface and the shelf above it.
Varying Item Size:
Ensure you have a balanced mix of small, medium, and large items. A lack of variation makes the display look boring or like a showroom.
Proper consideration of scale is fundamental to understanding how to style floating shelves to look professional.
Shelves Too Shallow:
Be mindful of the shelf depth. If your shelf is very shallow, avoid large stacks of books that overhang the edge, as this disrupts the clean lines central to how to style floating shelves.
Made from rich walnut with visible grain, this slim floating form is perfect for achieving a minimalist or contemporary farmhouse interior aesthetic.
By embracing design principles like the rule of thirds, texture contrast, and restraint, you can craft a sophisticated, balanced display.
The journey to mastering how to style floating shelves culminates in a space that feels curated, not cluttered.
Take this knowledge and try styling a small corner to let your unique personality shine through.


