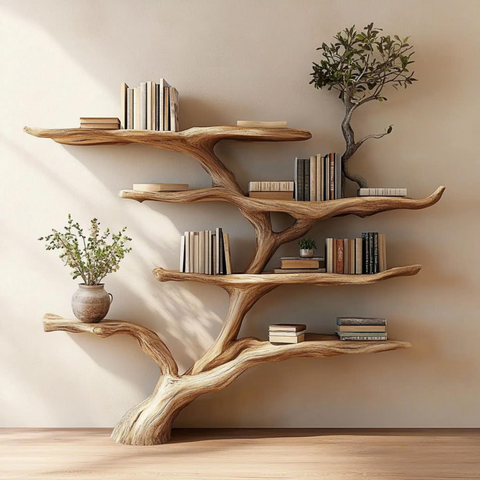
Cutting wood for a regular shelf is simple. But how to cut wood for a corner shelf—that’s where true craftsmanship begins. A corner shelf requires precision not just in angles, but in proportion, balance, and stability. One wrong cut can throw off the entire fit.
Whether you're a weekend DIYer or furnishing a space with character, knowing how to measure, mark, and cut your wood the right way can be the difference between a functional design feature and a frustrating redo.
In this guide, we’ll break down everything you need to know about how to cut wood for a corner shelf, including:
-
What tools you'll need (and why some matter more than others)
-
How to calculate and mark angles correctly
-
How to cut various types of wood cleanly
-
Tips for customizing shape, depth, and support
-
How to avoid common mistakes and finish your shelf like a pro
And if you're not quite ready to cut your own, don’t worry—we’ve included some finished product links that bring the beauty of handcrafted corner shelves without the sawdust.
1. Understanding the Structure of a Corner Shelf
Before cutting anything, you need to understand how corner shelves are built:
-
Wall-to-wall corner shelves: Fit between two 90° walls
-
Floating triangle shelves: Sit in the corner without side support
-
Tree-style or asymmetrical corner shelves: Artistic builds with uneven spacing
Knowing your end goal helps determine how you’ll cut each piece.
Cutting corners—literally—requires the right equipment. Here’s what makes it easier:
-
Measuring tape (accurate to 1/16")
-
Miter saw (for precise angle cuts)
-
Circular saw (for straight rip cuts)
-
Speed square or angle finder
-
Clamps to hold wood steady
-
Pencil + masking tape for clear marks
You don’t need the most expensive tools. You just need sharp blades and solid measurement.
3. How to Cut Wood for a Corner Shelf: Step-by-Step
Step 1: Measure the Wall Space
Measure both walls from the corner outward. If they’re uneven, note it—you’ll need to make asymmetric cuts.
Step 2: Mark Your Cut Lines
Use a pencil and speed square. For triangle corner shelves, you’ll usually cut 45° angles into each side.
Step 3: Set the Saw Angle
On your miter saw, set the bevel or blade to match the cut—typically 45° or 22.5° for decorative shelves.
Step 4: Clamp and Cut
Secure your wood. Use a fine-tooth blade for clean cuts—especially for visible edges like live-edge wood.
Step 5: Sand and Test Fit
Lightly sand edges with 120-grit paper. Dry-fit the shelf into the corner to ensure perfect contact.
You’ve just completed your first critical steps in how to cut wood for a corner shelf.
4. Choosing the Right Wood for Clean Corner Cuts
Some woods are easier to work with than others. For most corner shelves:
-
Pine or poplar: Easy to cut, affordable, great for painting
-
Oak or maple: Harder, more durable, best for stain or natural finish
-
Plywood: Lightweight, ideal for wall-mounted shelves
Live-edge slabs require more care, but result in stunning natural pieces.

Browse our corner bookshelf made from pre-cut reclaimed oak—zero guesswork, just mount and go.
5. How to Cut Custom Shapes for Tree-Style Shelves
Tree-shaped shelves aren’t just about angles—they’re about flow. Here’s how to cut wood for those branching lines:
-
Use cardboard templates to draw irregular shapes before transferring to wood
-
Cut with a jigsaw for smooth curves
-
For branch-like arms, round over the edges using a router for natural appeal
Every custom tree shelf starts with the same core skill: knowing how to cut wood for a corner shelf with intention.
 Want one already perfected? See our corner shelf design, hand-shaped and sealed for daily use.
6. Shelf Thickness and Support: Cutting for Strength
The thicker the shelf, the sturdier it is—but also heavier. Here’s a quick guide:
|
Shelf Depth
|
Recommended Thickness
|
|
6–8"
|
0.75" (standard)
|
|
10–12"
|
1" or reinforced edge
|
|
14–16"
|
1.25"+ with wall studs
|
When cutting wood for deeper shelves, plan for brackets or cleats to prevent sagging.

Prefer to skip calculations? Our heavy-duty corner shelf unit is pre-built to support books, decor, and more—no cuts needed.
7. Edge Finishing: How to Cut Clean and Seal Right
After your final cuts:
-
Use a sanding block or orbital sander to soften edges
-
Apply wood filler to any splinters or saw burns
-
Seal with polyurethane, natural oil, or wax
Want a rustic finish? Sand less. Want a modern look? Go smooth and crisp.

For perfectly smooth lines and rich walnut tone, explore our pre-finished walnut corner shelf handcrafted to perfection.
8. How to Cut Wood for Irregular Wall Angles
Not all walls form a perfect 90° angle. Older homes, converted spaces, and even some modern designs include off-square corners that need special attention.
To cut wood for these shelves:
-
Use an angle finder tool to get an accurate measurement.
-
Split the total corner angle between the two cuts. For example, if your corner is 87°, cut each end at 43.5°.
-
Dry-fit and sand as needed to ensure flush contact with both walls.
This added care makes all the difference when figuring out how to cut wood for a corner shelf in less-than-perfect spaces.
9. How to Cut Wood for Floating Bracket Systems
If your corner shelf will be mounted on hidden floating brackets, your cuts need to accommodate:
Mark center points and drill pilot holes before finishing the wood. Double-check all measurements—floating shelves are unforgiving if cut too short.
10. How to Cut Wood for Stacked Corner Units
Want to create a tower of corner shelves from floor to ceiling? You'll need to:
-
Cut multiple shelves of matching depth and length
-
Maintain consistent angles between units
-
Reinforce each piece with corner cleats or brackets
Stacked designs add height and drama to your space, but they demand exact cutting and planning. It's another layer of expertise in how to cut wood for a corner shelf that looks built-in.
13. Creative Design Options: Beyond the Triangle
Who says your corner shelf has to be a basic triangle? Once you’ve mastered how to cut wood for a corner shelf, experiment with:
-
L-shaped wraps that hug both walls
-
Wave or curve-shaped shelves for visual softness
-
Tree-inspired layouts with varied branch lengths and shapes
Custom cutting adds character and makes your shelf truly one-of-a-kind.
14. Reader Project Spotlight: Real Shelf, Real Cuts
We recently spoke to a reader who built a corner shelf from reclaimed walnut:
"The biggest challenge was getting the back cuts to meet tightly. Once I used a digital angle gauge, the rest went smooth. Cutting the shelf faces with a jigsaw gave me the curved tree look I was after. It’s my favorite thing in the room."
That’s what it’s all about—turning how to cut wood for a corner shelf into a project you’re proud of.
Conclusion: Cut With Confidence
Learning how to cut wood for a corner shelf isn’t about perfection—it’s about purpose. With the right tools, materials, and mindset, you can turn raw planks into something personal and functional.
And if you’re not ready for sawdust yet, that’s okay—Tailor Wood Haven offers handcrafted corner shelf designs that are cut, sanded, and finished for you.
 Skip to content


 Farmhouse Floating Shelves – Perfect handcrafted furniture
 Farmhouse Narrow Console Table with Storage for Entryway or Living Room
 Custom Rustic Console – Natural Wood, Made to Order